Ever wondered how to SSH into an IoT device from anywhere using AWS? You’re not alone. Many developers and tech enthusiasts are diving deep into this topic to unlock the full potential of remote device management. In this article, we’ll break down everything you need to know about SSH IoT device anywhere AWS example in simple terms, with practical steps and actionable tips.
Let’s be honest, managing IoT devices remotely can be a headache if you don’t have the right tools. But with AWS, you’ve got a powerhouse at your fingertips. Whether you’re a seasoned pro or just starting out, this guide will walk you through the process step by step.
By the end of this article, you’ll not only understand how SSH IoT device anywhere works but also how AWS makes it seamless. So, buckle up and let’s dive in!
Table of Contents
- What is SSH IoT Device Anywhere?
- Why Use AWS for SSH IoT Device Anywhere?
- Understanding AWS IoT Core
- Setup Steps for SSH IoT Device Anywhere
- Security Considerations
- Tools You’ll Need
- AWS Example: A Practical Walkthrough
- Troubleshooting Common Issues
- Benefits of Using AWS for SSH IoT Device Anywhere
- Conclusion
What is SSH IoT Device Anywhere?
So, what exactly does SSH IoT device anywhere mean? Simply put, it’s the ability to securely access your IoT devices from any location using SSH (Secure Shell). This is super handy when you’ve got devices spread across different locations and need to manage them remotely.
Think about it like this: imagine you’ve got a smart thermostat installed in a remote cabin. If something goes wrong, you don’t want to drive miles just to fix it. With SSH IoT device anywhere, you can log in, diagnose the issue, and resolve it without lifting a finger.
Now, here’s the kicker—doing this securely and efficiently requires the right infrastructure. That’s where AWS comes in. AWS provides the tools and services to make SSH IoT device anywhere a breeze.
Why SSH is Important for IoT
SSH isn’t just some random protocol; it’s the backbone of secure remote access. For IoT devices, security is paramount. You don’t want hackers gaining access to your devices and wreaking havoc. SSH ensures that your connection is encrypted and secure, giving you peace of mind.
Plus, SSH is versatile. Whether you’re managing a single device or a fleet of them, SSH scales effortlessly. And with AWS, you’ve got the scalability and reliability to handle even the most complex setups.
Why Use AWS for SSH IoT Device Anywhere?
AWS isn’t just another cloud provider; it’s the go-to platform for developers and businesses worldwide. When it comes to SSH IoT device anywhere, AWS offers a range of features that make it stand out.
First off, AWS has a massive global infrastructure. This means you can access your devices from anywhere in the world with minimal latency. No more waiting for connections to stabilize or dealing with dropped connections.
Second, AWS provides robust security features. From encryption to identity management, AWS ensures that your data and devices are protected. And with services like AWS IoT Core, managing your devices becomes a piece of cake.
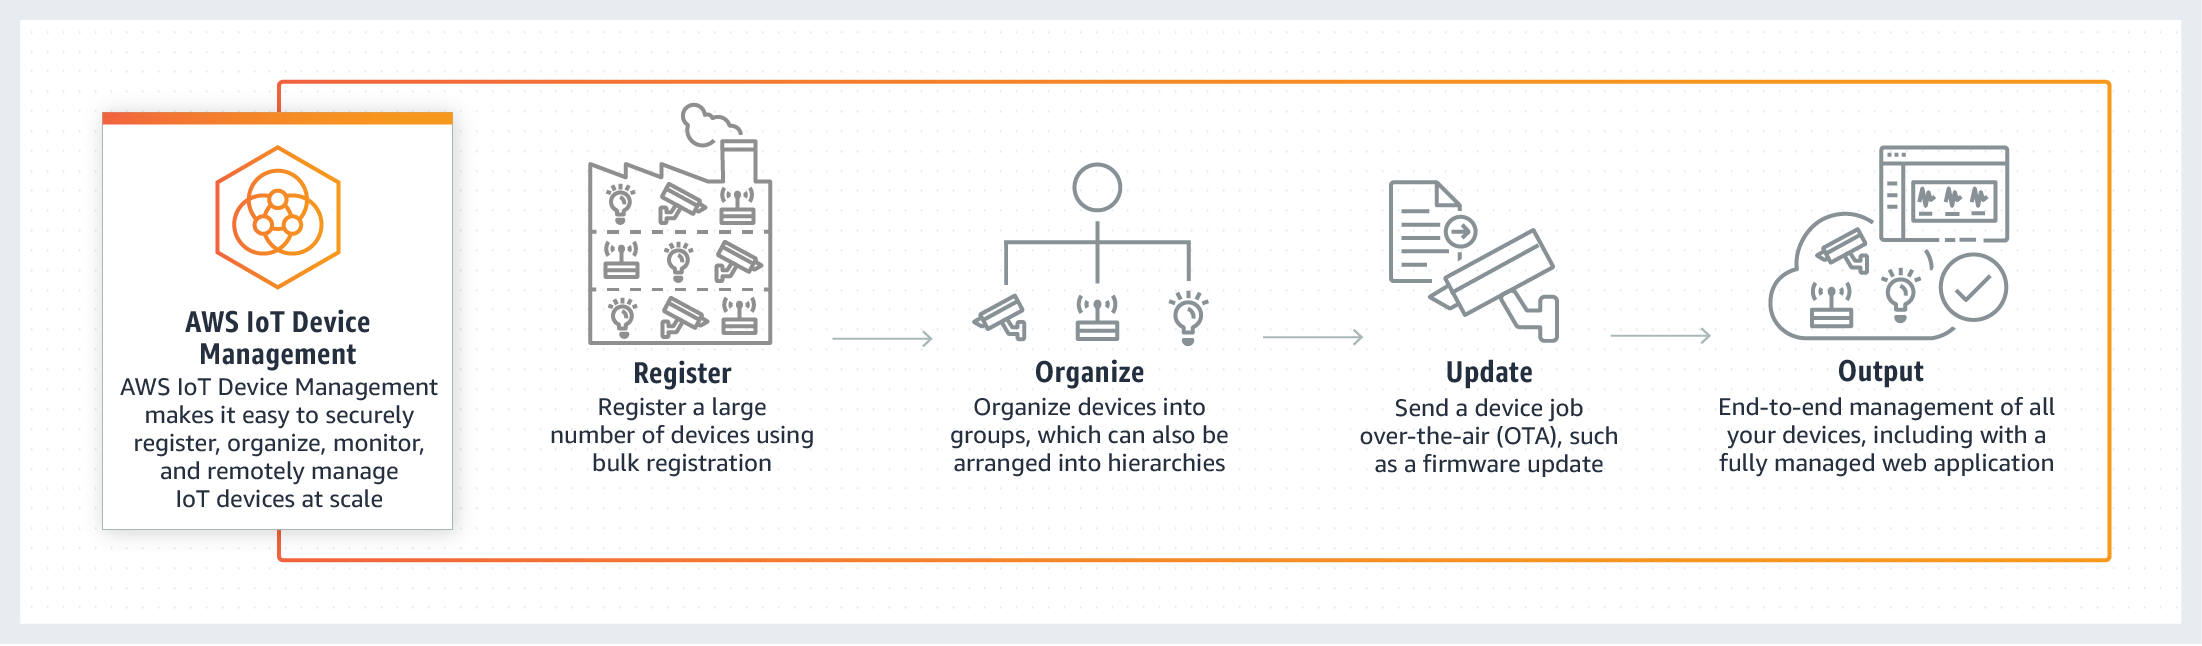
AWS IoT Core: The Heart of It All
Speaking of AWS IoT Core, this is where the magic happens. AWS IoT Core is a managed cloud service that lets you connect IoT devices easily and securely. It acts as the bridge between your devices and the cloud, enabling seamless communication.
Here’s how it works: when you set up SSH IoT device anywhere, AWS IoT Core handles the heavy lifting. It manages device authentication, data encryption, and message routing, so you don’t have to worry about the nitty-gritty details.
Plus, AWS IoT Core integrates seamlessly with other AWS services, giving you a fully integrated ecosystem for managing your IoT devices.
Setup Steps for SSH IoT Device Anywhere
Alright, let’s get down to business. Here’s a step-by-step guide to setting up SSH IoT device anywhere using AWS.
Step 1: Set Up Your AWS Account
First things first, you’ll need an AWS account. If you don’t have one yet, head over to the AWS website and sign up. Once you’re all set, log in to the AWS Management Console.
Step 2: Create an IoT Thing
Next, create an IoT Thing in AWS IoT Core. This represents your IoT device in the cloud. Give it a unique name and attach any relevant attributes.
Step 3: Configure Security
Security is key, so make sure you configure it properly. Create a certificate for your device and attach a policy that defines its permissions. This ensures that only authorized devices can connect to AWS.
Step 4: Connect Your Device
Now it’s time to connect your device to AWS IoT Core. Use the AWS SDK or CLI to establish the connection. Once connected, your device will be able to communicate with the cloud.
Step 5: Set Up SSH
Finally, set up SSH on your device. Install an SSH server and configure it to listen for incoming connections. Use AWS IoT Core to route SSH traffic securely to your device.
Security Considerations
When it comes to SSH IoT device anywhere, security should always be top of mind. Here are some best practices to keep your devices safe:
- Use strong passwords and avoid default credentials.
- Enable two-factor authentication for added security.
- Regularly update your device firmware and software.
- Monitor your devices for suspicious activity.
Remember, security is an ongoing process. Stay vigilant and keep your devices protected.
Tools You’ll Need
To make the most of SSH IoT device anywhere with AWS, you’ll need a few tools in your arsenal:
- AWS CLI: Command-line interface for interacting with AWS services.
- SSH Client: A tool for establishing SSH connections.
- IoT Device: The device you want to manage remotely.
- Text Editor: For editing configuration files and scripts.
Having the right tools will make the setup process smoother and more efficient.
AWS Example: A Practical Walkthrough
Let’s walk through a practical example of SSH IoT device anywhere with AWS. Imagine you’ve got a Raspberry Pi installed in a remote location. Here’s how you can SSH into it using AWS:
First, create an IoT Thing in AWS IoT Core and attach a certificate to it. Then, install the AWS IoT Device SDK on your Raspberry Pi and connect it to AWS IoT Core.
Next, set up an SSH server on your Raspberry Pi and configure it to listen for incoming connections. Use AWS IoT Core to route SSH traffic securely to your device.
Finally, use an SSH client to connect to your Raspberry Pi from anywhere in the world. Voilà! You’re now managing your device remotely with ease.
Troubleshooting Common Issues
Even the best setups can run into issues. Here are some common problems you might encounter and how to fix them:
- Connection Issues: Check your network settings and ensure that your device is properly connected to AWS IoT Core.
- Authentication Errors: Verify that your device certificate and policy are correctly configured.
- SSH Not Working: Make sure the SSH server is running and listening on the correct port.
By addressing these issues promptly, you can keep your setup running smoothly.
Benefits of Using AWS for SSH IoT Device Anywhere
So, why should you choose AWS for SSH IoT device anywhere? Here are some compelling reasons:
- Scalability: AWS can handle large numbers of devices with ease.
- Security: AWS provides robust security features to protect your devices.
- Reliability: AWS’s global infrastructure ensures low latency and high availability.
- Integration: AWS services work seamlessly together, giving you a fully integrated solution.
With AWS, you’ve got everything you need to manage your IoT devices remotely with confidence.
Conclusion
SSH IoT device anywhere with AWS example is a game-changer for remote device management. By following the steps outlined in this article, you can set up a secure and efficient system for accessing your IoT devices from anywhere in the world.
Remember to prioritize security and stay up to date with the latest best practices. And don’t forget to leverage the power of AWS to make your setup as seamless as possible.
So, what are you waiting for? Start exploring the possibilities of SSH IoT device anywhere with AWS today. Share your thoughts in the comments below and let us know how this guide helped you. Happy coding!