Let’s talk about Raspberry Pi P2P setup, shall we? If you’re reading this, chances are you’ve heard about the Raspberry Pi and its incredible versatility. But here’s the deal—setting up a P2P network with Raspberry Pi is like unlocking a whole new level of tech wizardry. Whether you’re a hobbyist, a student, or just someone who loves tinkering with gadgets, this guide is about to change your life. So grab a coffee, settle in, and let’s dive into the world of decentralized networking.
Now, before we get all techy on you, let’s break it down. A Raspberry Pi P2P setup allows you to create a peer-to-peer network where devices can communicate directly with each other without needing a central server. This means no middleman, no extra costs, and—most importantly—no reliance on external infrastructure. It’s like giving your devices superpowers to talk to each other seamlessly.
But why should you care? Well, if you’ve ever dealt with slow internet, unreliable Wi-Fi, or just wanted to share files privately without exposing your data to the world, this setup could be your golden ticket. Plus, it’s a great way to learn more about networking and how computers interact. So, are you ready to geek out with me? Let’s go!
What is Raspberry Pi P2P Setup Anyway?
Alright, let’s get into the nitty-gritty. Raspberry Pi P2P setup is essentially about configuring your Raspberry Pi to act as a node in a peer-to-peer network. Think of it like a mini server that can connect directly to other devices without needing a traditional router or ISP. This setup is perfect for creating local networks, sharing files, or even running decentralized apps.
Here’s the kicker: P2P networks are all about decentralization. Instead of having one central point controlling everything, each device in the network shares responsibility. This makes the network more robust, secure, and efficient. Plus, it’s wicked cool to say you’ve built your own P2P network, right?
Why Choose Raspberry Pi for P2P Networking?
Let’s be honest—there are tons of devices out there that can do P2P networking, but the Raspberry Pi stands out for a few reasons. First, it’s affordable. You don’t need to break the bank to get started. Second, it’s incredibly versatile. With a little know-how, you can configure it to do just about anything. And third, it’s community-supported. There are tons of resources, forums, and tutorials to help you along the way.
Plus, Raspberry Pi is lightweight and energy-efficient, making it perfect for running 24/7 without worrying about your electricity bill skyrocketing. It’s like the Swiss Army knife of tech gadgets.
Benefits of Raspberry Pi P2P Setup
So, what’s in it for you? Here’s a quick rundown of why Raspberry Pi P2P setup is worth your time:
- Cost-Effective: You don’t need expensive hardware or subscriptions to set up a P2P network.
- Decentralized: No reliance on external servers or ISPs means more control over your data.
- Scalable: Whether you’re connecting two devices or twenty, Raspberry Pi can handle it.
- Learning Opportunity: Setting up a P2P network is a fantastic way to deepen your understanding of networking concepts.
And let’s not forget the satisfaction of building something yourself. There’s nothing quite like watching your Raspberry Pi come to life and doing exactly what you programmed it to do.
Step-by-Step Guide to Raspberry Pi P2P Setup
Now that you know why Raspberry Pi P2P setup is awesome, let’s walk through the steps to get it up and running. Don’t worry—I’ll make it as easy as possible, even if you’re new to all this tech stuff.
What You’ll Need
Before we begin, make sure you’ve got the following:
- Raspberry Pi (any model will do, but newer ones are faster).
- MicroSD card with Raspberry Pi OS installed.
- Power supply for your Raspberry Pi.
- Basic networking knowledge (don’t worry, we’ll cover the basics).
Got everything? Great! Let’s move on.
Step 1: Install Raspberry Pi OS
First things first, you’ll need to install Raspberry Pi OS on your microSD card. You can download it from the official Raspberry Pi website. Once you’ve got the image file, use a tool like Balena Etcher to flash it onto your microSD card. Easy peasy.
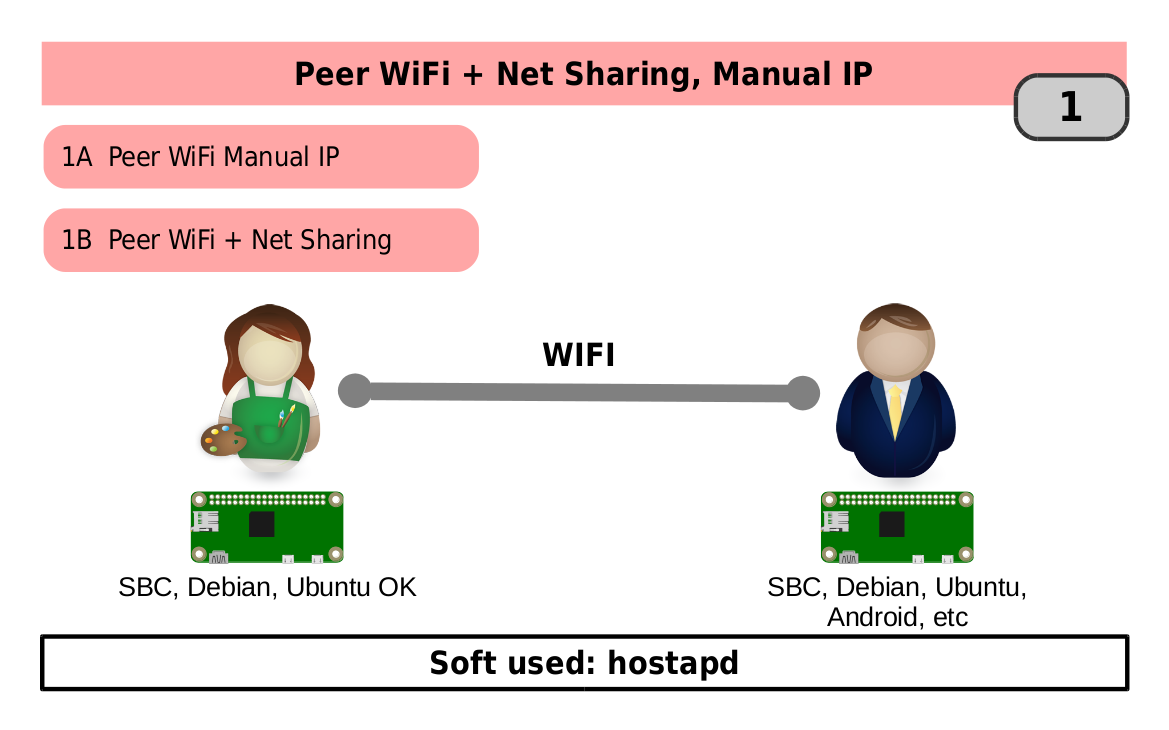
Step 2: Configure Wi-Fi Settings
Next, you’ll want to set up Wi-Fi so your Raspberry Pi can connect to other devices. You can do this by editing the `wpa_supplicant.conf` file on the microSD card. Just add your network credentials, and you’re good to go.
Step 3: Enable SSH
SSH (Secure Shell) allows you to remotely access your Raspberry Pi. To enable it, create an empty file called `ssh` on the boot partition of your microSD card. That’s it—no fancy settings required.
Step 4: Set Up P2P Networking
This is where the magic happens. You’ll need to configure your Raspberry Pi to act as a P2P node. There are several ways to do this, but one of the easiest is using tools like `avahi-daemon` or `ZeroTier`. These tools allow your Raspberry Pi to discover and connect to other devices on the network.
For example, with ZeroTier, you can create a virtual network and invite other devices to join. It’s like setting up a private internet just for you and your friends.
Step 5: Test Your Connection
Once everything’s set up, it’s time to test your connection. Use commands like `ping` or `ssh` to verify that your Raspberry Pi can communicate with other devices on the network. If everything’s working, congrats—you’ve just built your own P2P network!
Tips and Tricks for Raspberry Pi P2P Setup
Here are a few tips to make your Raspberry Pi P2P setup even smoother:
- Use Static IPs: Assign static IP addresses to your devices for better stability.
- Optimize Performance: Tweak your Raspberry Pi settings to ensure it runs smoothly.
- Secure Your Network: Use strong passwords and encryption to protect your data.
- Experiment: Don’t be afraid to try new things and push the limits of what your Raspberry Pi can do.
Remember, the more you tinker, the more you’ll learn. So don’t be discouraged if something doesn’t work the first time. Trial and error is all part of the fun!
Common Challenges and How to Overcome Them
Let’s face it—setting up a Raspberry Pi P2P network isn’t always a walk in the park. Here are some common challenges you might encounter and how to fix them:
Challenge 1: Connectivity Issues
If your devices can’t connect, double-check your Wi-Fi settings and make sure SSH is enabled. You might also want to try restarting your Raspberry Pi or resetting your network.
Challenge 2: Performance Bottlenecks
If your network feels sluggish, consider upgrading your hardware or optimizing your software. Sometimes, a simple tweak can make a huge difference.
Challenge 3: Security Concerns
Security is always a top priority, especially when dealing with P2P networks. Make sure you’re using strong encryption and regularly updating your software to patch any vulnerabilities.
Applications of Raspberry Pi P2P Setup
So, what can you actually do with a Raspberry Pi P2P setup? The possibilities are endless:
- File Sharing: Share files between devices without needing cloud storage.
- Decentralized Apps: Run apps that don’t rely on central servers.
- IoT Devices: Connect smart devices in your home for seamless communication.
- Private Messaging: Set up a secure messaging system for you and your friends.
With a little creativity, you can use your Raspberry Pi P2P setup for just about anything. The only limit is your imagination!
Conclusion: Take the Leap and Build Your Own P2P Network
There you have it—everything you need to know about Raspberry Pi P2P setup. From understanding the basics to overcoming common challenges, this guide has got you covered. Now it’s time to take action. Go ahead and set up your own P2P network. Trust me, you won’t regret it.
And don’t forget to share your experience with us in the comments below. Whether you’ve got questions, tips, or just want to show off your cool project, we’d love to hear from you. Happy tinkering, and remember—the future of networking is in your hands!
Table of Contents: